Introductory Tips
- Be a beginner. Enjoy the newness of it all! It's okay to make mistakes, forget what you just learned, and need lots of help as you pick up new skills. That doesn't mean you can't be ambitious or that certain designs are beyond you. You just gotta be patient on your way there.
Try the Socratic approach. "Admit you don't know anything; you'll begin to know more."
- Take it slow. You're doing this for fun, aren't you? Unless your website is a school project, you won't have a deadline. You can learn and create at your own pace, without pressuring yourself to be the best ASAP.
I promise, all your favourite websites, all your favourite works of art, everyone's favourite ANYTHING, took lots of time, effort, and dedication to create.
- Don't be afraid to start over. It took me 3 or 4 tries to create my first functional website— and that was just functional. As you see it now, Vivarism is the product of 5+ years spent refining my aesthetic, learning CSS tricks, and generally just developing as a human being.
Basically, be prepared to hate a webpage that once made you proud. That's one sign that you're growing!
To start: if you don't have one already, make a Neocities account. Choose a username you don't hate, an e-mail you have consistent access to, and go through their interactive tutorial. This will teach you all the absolute basics that you need to know.
I recommend Neocities because it is:
- Free
- Easy
- Probably how you landed on this side of the Internet, anyways!
Learn As You Go
While it's all well and good taking classes to learn something new, researching an activity is not the same as actually doing it. You could spend weeks reading tutorials like this one and not even have a "hello world!" to show for it. My greatest advice to you:
Just start making your website!
After you finish reading here, go do one small thing to move your project along. If you are already taking an HTML/CSS course, push yourself to apply something from every lesson to your actual site.
When In Doubt, Search For "CSS"
Personally, I have never taken any courses on web design. My process is like: I have a very specific vision → I do my best to create it → Fuck, I don't know how → I look for help online.
My early searches were literally things like...
- css how to change link colour
- css multiple background images
- css gradient generator
- css text outline
- css flexbox vs grid
... and on and on and on. Truthfully, the learning never stops. For years I kept a pinned tab of CSS selectors. Even now I'm constantly looking up random things about tables, filters, animations... Looking things up means you are learning. Unless you're taking a test, don't try to do anything from memory. Let the memorisation come from consistent practice.
Trusted Resources
When you're searching stuff up, look for results from the following websites:
Of course, these are not the only websites worth looking at. As your research gets more advanced, sometimes you'll find what you're looking for on a random blog from 2002. The great thing about CSS is that you can change it very quickly and easily, oftentimes instantly undoing mistakes. Therefore, there's no risk when trying new things. Simply remove or rewrite code that doesn't work. Cheer when the computer does what you want it to do. That's all there is to it!
Dissect Your Favourite Sites
Ever see an amazing website and think, "wow, how did they do that?!" Well, you literally can see exactly how they did it.
Both Chromium and Firefox-based browsers have DevTools that you can open with the keyboard shortcut Ctrl + Shift + I on Windows/Linux, or Cmd + Shift + I on MacOS. You can also right click (or Ctrl + click on MacOS) on the page and select "inspect."
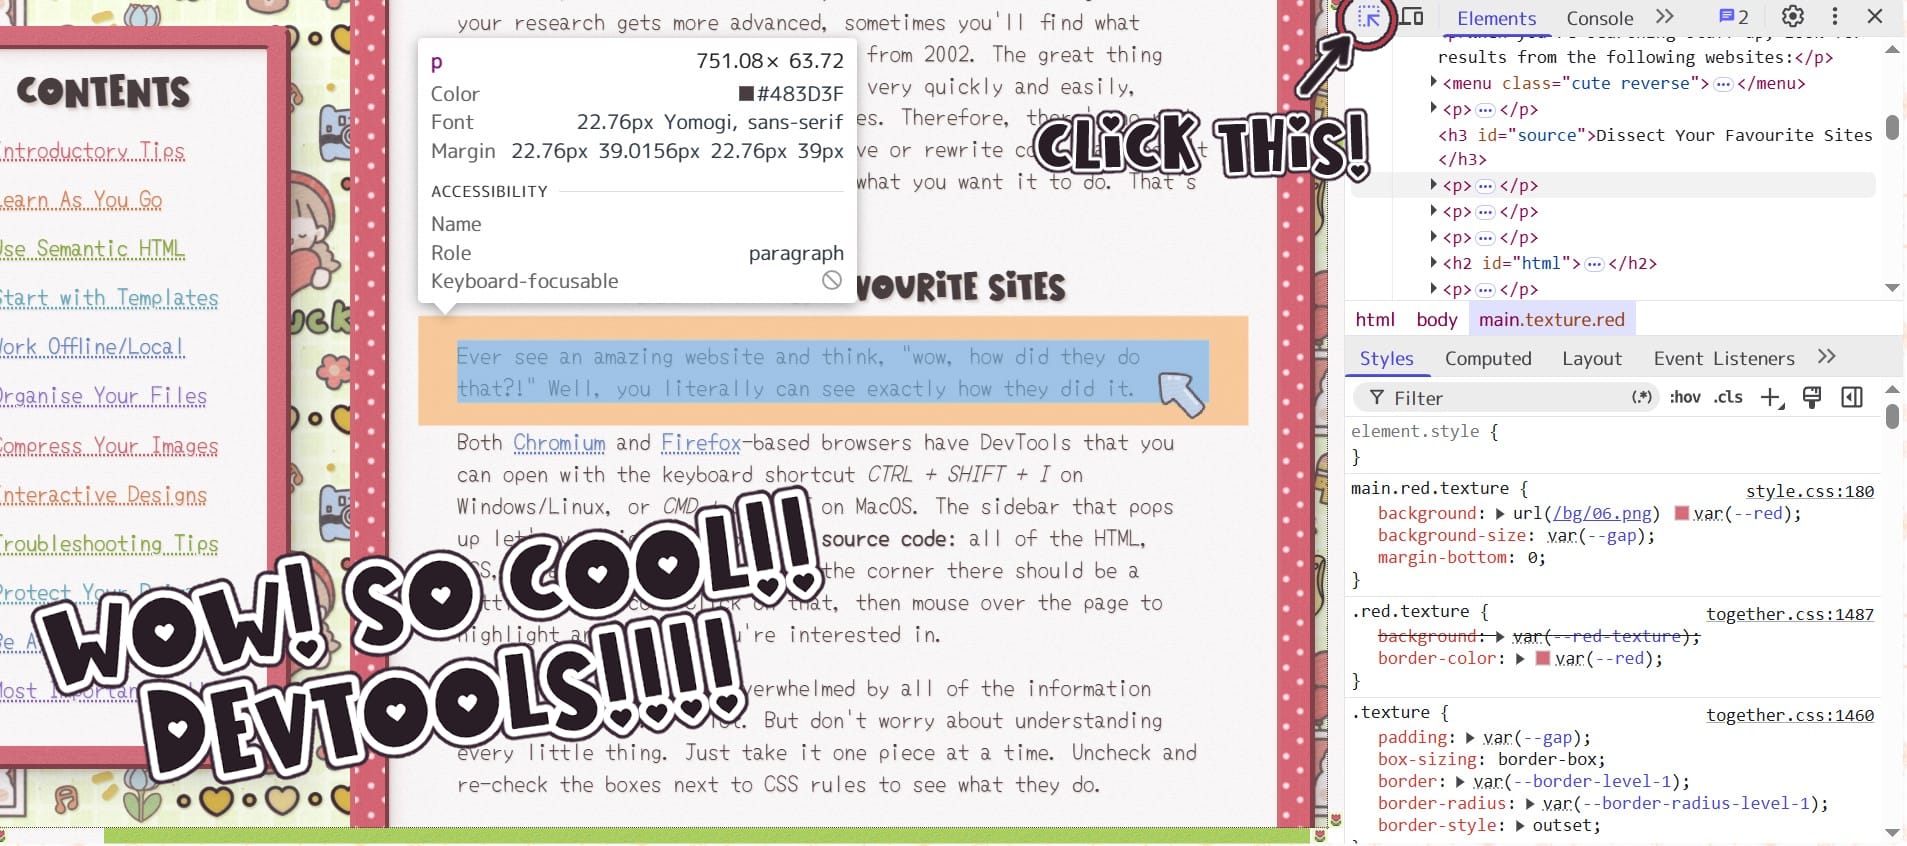 The sidebar that pops up let's you inspect any website's inner-workings: all of the HTML, CSS, Javascript, assets, everything! In the corner there should be a little cursor icon. Click on that, then mouse over the page to highlight any element you're interested in.
At first you might feel overwhelmed by all of the information because there is... a lot. But don't worry about understanding every little thing. Just take it one piece at a time. Uncheck and re-check the boxes next to CSS rules to see what they do. I figured everything out through years of trial, error, and exploration, but you can always consult the DevTools documentation linked above if you think that will help.
Another way to view a website's raw files is pressing Ctrl + U on Windows/Linux and Cmd + U on MacOS. You can also right click (or Ctrl + click on MacOS) on the page and select "view page source." This version is not interactive but may still be of use to you in various ways.
You have the right to investigate any website and learn from it's construction. I encourage you to take inspiration from others' designs when creating your own. However, it is bad etiquette to copy/paste too much of another's work. More details in the Be A Good Netizen section.
For one more disclaimer... Though I used this page in my example screenshot, I actually do not recommend trying to learn CSS from any of my websites. The way I work is too weird and complicated for beginners to parse. If you're determined, I can't stop you, but I just thought I'd warn you LOL.
Use Semantic HTML
Right, you already know a bit of HTML, so what's all this semantic nonsense about?? This article by Web.Dev explains it better than I can. Their entire "Learn HTML" course is pretty helpful, too!
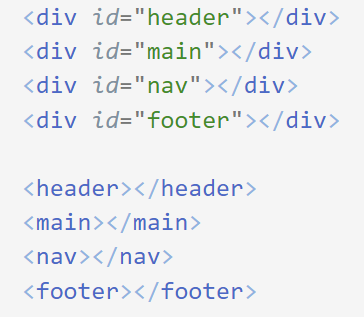
Basically, instead of having 4,000 <div>s, you'll make some of them into <header>, <main>, <nav>, and <footer>. There are many, many more semantic elements, but those five are the most important. Every page should have them! And don't worry, you will still use regular, ol' <div>s inside and outside these elements.
Pro Tip: <aside> does NOT mean "sidebar!"
If you want sidebars, use <section> or, if they're for navigation, <nav>.
Not only does this make for more legible code, it also allows reading mode to parse your webpage. You may have already noticed this incredible accessibility feature on iOS, Android, and most other mobile web browsers. You may have also noticed that many indie websites in this sphere are not optimised for mobile viewing. And I don't say that to be rude— most of the time, Cellphone-Vivarism looks like shit, too!!!
But learning responsive CSS and mobile-friendly design is a massive undertaking. Seriously, even I am still a beginner there. And now that I discovered reading mode... I honestly don't have much incentive to learn! So, until you are ready to tackle mobile design (and you may never be ready), semantic HTML is the best way to make your content more accessible for everyone. The only thing you have to do is swap out some <div>s for <header> and <main>.
Start With Templates
When choosing a template, start by asking yourself what you need. Do you need something for your entire website, or just one page? Do you want a blog? An image gallery? Do you need it to look good on desktop, mobile, or both? When the same page instantly adapts to different screen sizes and orientations (i.e. landscape or portrait), that's called responsive design.
Find a template you like, follow the creator's instructions, and edit it to your heart's content! Seriously, just try one thing or another and see what happens. Don't be afraid of breaking anything. You can always undo it, or start over with another template after. You can even mash different templates together to create something totally unique.
My Recommended Templates
One day I plan to make some of my own! But until then, I highly recommend Nenrikido's work. I can vouch for her as both an excellent webdesigner and phenomenal person. I am also a fan of Electric-Tenshi's designs. If you want to browse around on your own, start with Lazerbunny's resource page. She has collected all kinds of amazing links. Not just templates but like, literally everything!!!
MDN Docs also has a "CSS layout cookbook" to help you create common layout patterns. Consider which layout is best for the content you want to present and go from there.
Pro Tip: add semantic HTML to templates that don't already have it!
Remember, not all templates are created equal. Code is only as skillfully written as its creator's present capability. Don't be surprised when an amateur's code is messy, broken, or incomplete... But even wise women can learn from fools*, can't we? Just do the best you can to bring your vision to life!
*It's just a figure of speech. I am not calling anyone a fool.
Work Offline/Local
Did your personal website journey begin with a service like Carrd, Strawpage, Tumblr, or Neopets? All of them will have you creating pages directly in your web browser. When you graduate to Neocities, Nekoweb, FC2, or even Wordpress, you'll find they work in similar ways. However, this is not ideal for a few reasons:
- These services can go down at any time, locking you out of your own projects and potentially deleting them forever.
- Your page updates live in real-time, revealing works-in-progress to the entire world wide web.
- What if you have no Internet access?! You won't be able to work on your website— so boring!!!
Thank goodness you can download, create, and edit HTML and CSS files on your own computer! This is the superior way to work because:
- You retain complete control over all your files
- Nobody sees your work until you're ready to share it
- From an organisational standpoint, it's just so much faster and easier
If you already have a website that you've spent some time on, download the whole thing from your webhost.
 On Neocities, for example, go to your dashboard, scroll to the very bottom, and click the download link. If your host has no such option, do not go to your actual website and right click + save as the pages themselves. Instead, use the Ctrl + U (or Cmd + U) method to view the source code. Then right click + save as all of your HTML and CSS files!
Choose Your Text Editor
The best text editors are free and have quality-of-life features like syntax highlighting, code folding, auto-completion, and auto-suggestions. If none of those words mean anything to you, don't worry about it! Just download VSCodium or Sublime Text and call it a day. I personally swear by VSCodium, which is just M*crosoft's Visual Studio Code without the skeevy data collection.
I do NOT recommend Notepad++ for beginners... or anyone, for that matter. Don't get me wrong, it's a stand-up little program! For fifteen years I've been using it to write .txt files. But I and many others agree it's a terrible, terrible choice if you want to learn and, more importantly, enjoy learning how to code. If you insist on using Notepadd++, here's some discussion about plugins that will help you.
Anyways, working on your site offline is as simple as opening your work in your shiny new text editor, and double clicking on the HTML files to open them in your browser. Change something in VSCodium, save it, refresh the browser page, see the results... And that's it! That's your entire workflow!!!
Pro tip: Use Alt + Tab on Windows/Linux, or Cmd + Tab on MacOS, to quickly switch between different windows.
Choose Your File Transfer Software
Well, that's the entire workflow until it's time to upload your stuff. Some hosts like Neocities, Nekoweb, FC2, and WordPress offer drag-n-drop uploads. Others do not, and even if they do, file transfer programs are super convenient and easy to use! I use WinSCP and sometimes FileZilla. It's hard to get into the specifics about SFTP (SSH File Transfer Protocol) stuff because technicalities vary from webhost to webhost. When in doubt, consult their tech team for help.
Optional: Partition Your Hard Drive
Because I am a Tiny10 truther, I cannot help you with any other operating systems. I'm sorry!
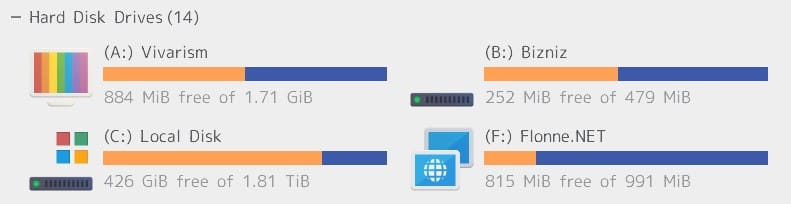
Any Windows user should be familiar with the default C: drive, but what about A:, B:, and F:?! I use Storage Spaces to create separate drives for each of my web development projects. From a purely organisational standpoint, this is obviously ideal. I am also obsessed with relative links and this allows me to easily write paths from the "root" (i.e. topmost area) of the directory.
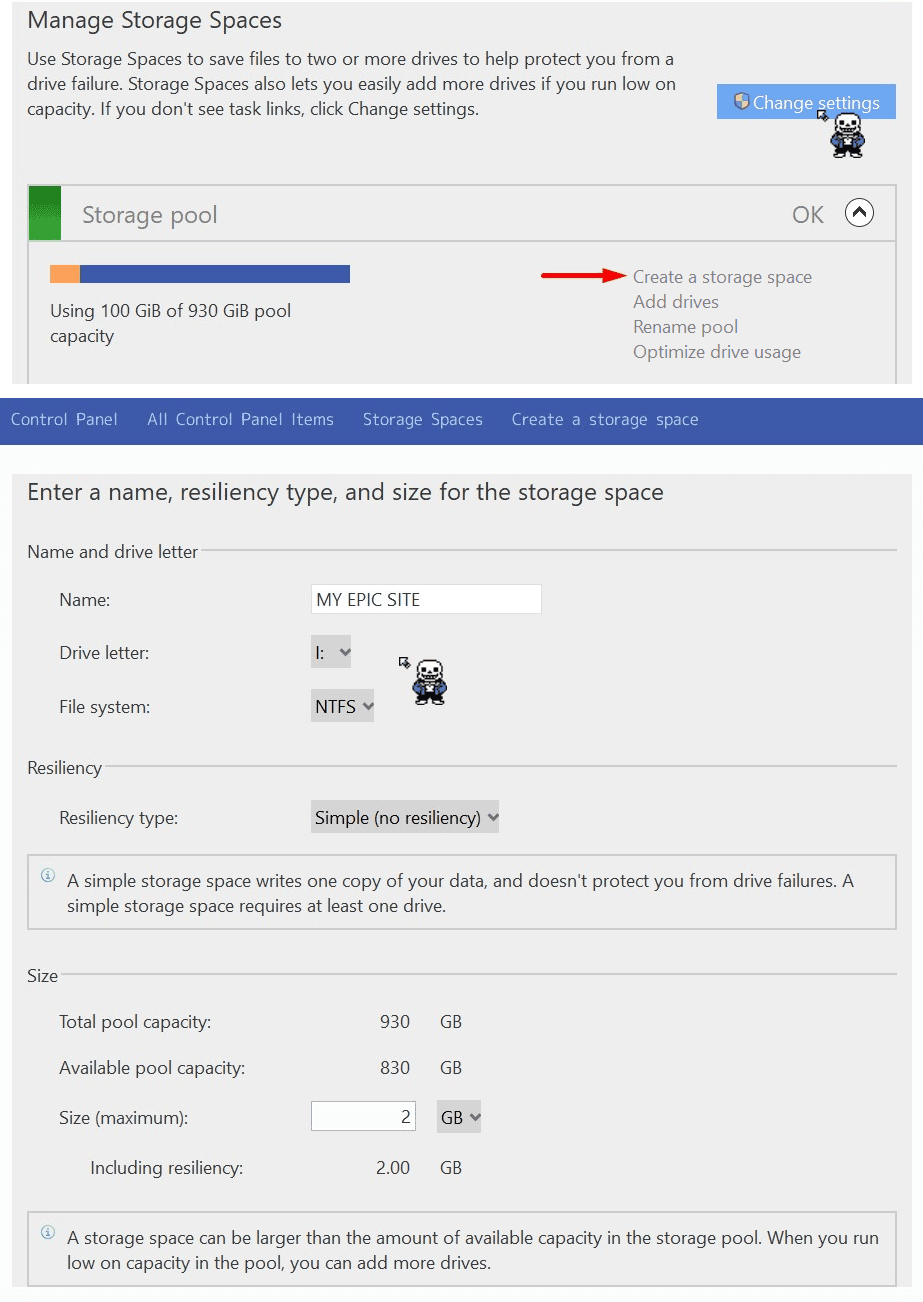
It's very easy. All you have to do is navigate to the Storage Spaces section in Control Panel. Click "change settings" (you need admin access!) and then "create a storage space."
Name your partition. Pick any drive letter. Change the resiliency to "simple," give yourself 1-2 GB of storage, and that's it!
Press "create storage space" at the very bottom of the window to make your new drive.
Copy/paste all your website materials from your main drive into the new one. Pretend the storage space is the folder that used to hold everything before. So rather than having I:\website\all my website stuff, you'll just have I:\all my website stuff. Does that make sense?!
Anyways, like I said, this is totally optional. But it's a big component of the way I work, so I thought I'd share this practice with you, too.
Organise Your Files
Let me start by telling you what not to do. What I often refer to as "my first functional website," 5amboyfriend was a hot fucking mess under the hood. As it goes for everyone brave enough to try something new, I was clueless and just kind of did whatever. If it worked, it worked, and I didn't think much harder about it. As such, my files were laid out... like this...
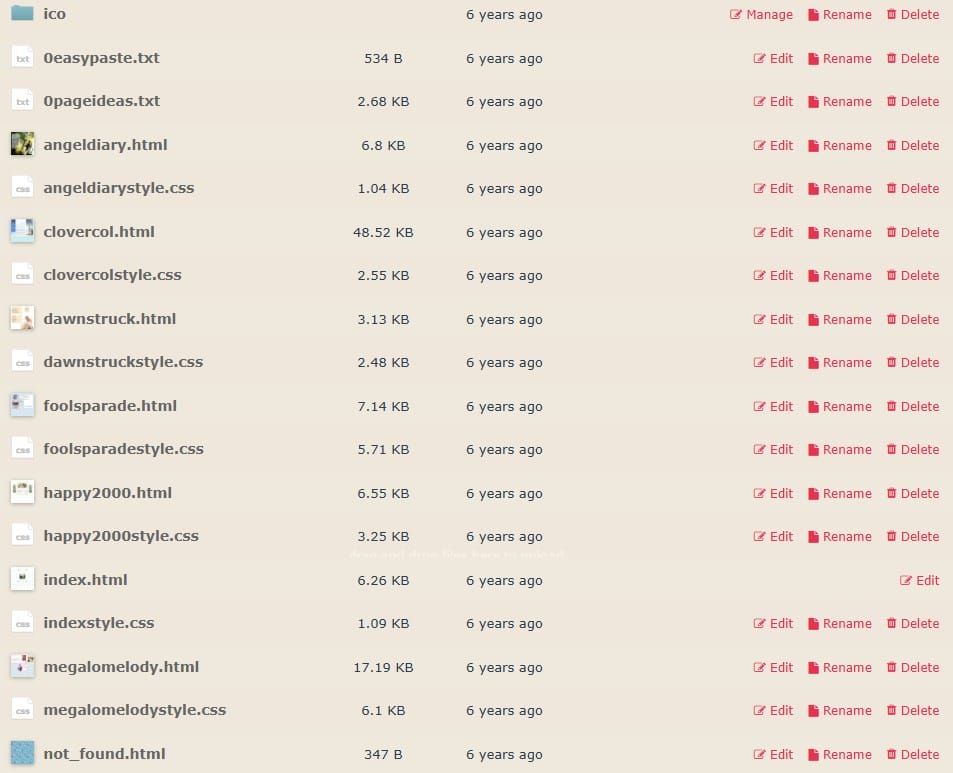
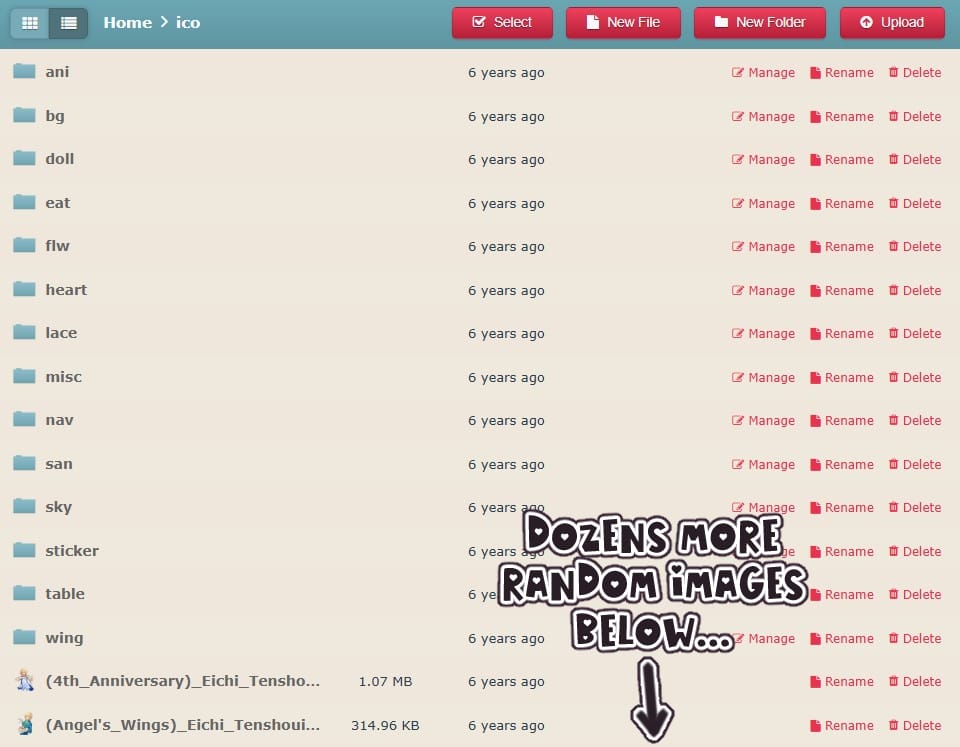
All of my HTML and CSS files are in the root (i.e. first/topmost) directory. All of them have nonsense names. The only reason we see an index.html is because Neocities creates it for you, and won't allow you to delete or rename it. My "ico" folder holds assets for the entire site, which thankfully were sorted at least a little bit... but mostly it's just Ensemble Stars .PNGs that I never even used.
5+ years of trial and error have really paid off! I feel like I've totally cracked the code, and now I want to share my ~secrets~ (lol) with you, too. Your basic file structure should be like this:
- website folder (or website partition)
- assets folder
- backgrounds
- stickers
- whatever!
- index.html
- style.css
- assets folder
The Power of Index.HTML
Why does Neocities automatically create an index.html file for you, and not allow you to delete or rename it? Because it is the most important file you can have.
 The
The index.html file in your root (i.e. first/topmost) directory displays on the web as https://website.com/— AKA the one and only way people can access your site! From here on, I'll refer to that particular index.html file as "the index."
While that index is the most important index, there will be multiple index.html files. In fact, you should have one in every single directory that you want to make into a webpage. For example, the "assets" folder will only have images in it. It has no index file because it is not meant to be accessed by visitors or, as the tech professionals call it (I'm not joking), indexed.
How do we make new pages then? Let's say you want to add a diary to your website. Create a new directory following the same structure mentioned above: a new folder called "diary," containing an assets folder, an index.html file and a style.css file.
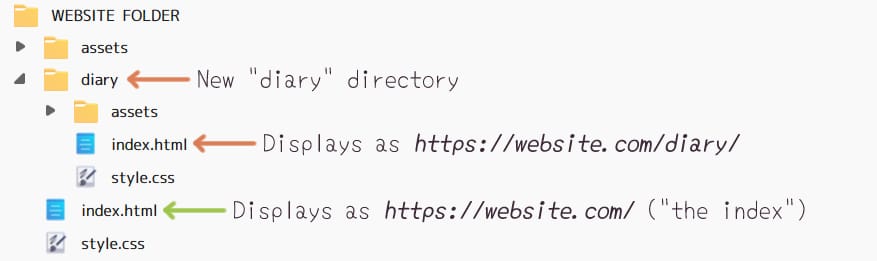
See how index.html within "diary" renders online as https://website.com/diary/? That's a nice, clean URL. On 5AMBF's sequel, 5amgirlfriend, I still knew nothing about index files, so I wound up with a lot of objectively terrible URLs like https://5amgirlfriend.neocities.org/hobby/minecraft/mcskk...
It's just ridiculous. Do better than I did!!! Kneel before the power of index.html!
Pro tip: always name your folders in all lowercase, because https://website.com/diary/ and https://website.com/Diary/ are completely different links!
Stylesheets & Assets
In the earlier example of the "diary" folder, I imagined it would look and function quite differently from the index, AKA the front page of your website. Therefore, it needs its own assets folder and stylesheet.
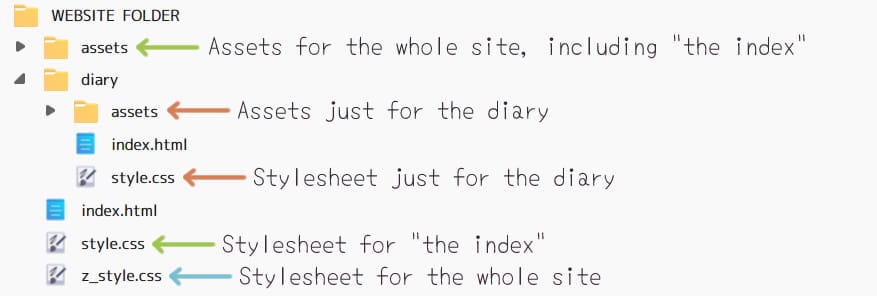
You may have noticed that I've added z_style.css to the root directory. Perhaps, even with variation in your designs, you keep certain style principles across your entire website. Fonts, for example, or colour schemes. Rather than copy/pasting the same code over and over again, now you can easily reference that stylesheet in all of your files. And you can edit everything at once, rather than playing whack-a-mole across multiple files.
Pro tip: when using this organisational system, add the following code to the <head> tag at the top of every .HTML file to reference both your universal and per-directory stylesheets:
            <link rel="stylesheet" type="text/css" href="/z_style.css">


            <link rel="stylesheet" type="text/css" href="./style.css">
Peep the relative file paths!
Although you can write CSS directly into HTML, I always keep the bulk of my styling in a separate .CSS file. I suggest you do the same. Most importantly, it enables your text editor's auto-suggestion and auto-completion features. Plus, having one .CSS file per section keeps everything nice and organised, and makes it easy to change things later.
I follow a similar philosophy with asset folders: one per directory. I run image-heavy websites, so this works great for me. What exactly goes in them and how many subfolders you create, that's up to you. Basically, they're home to images, videos, music— everything that's not an .HTML, .CSS, or .JS file.
A Bit About URLs
Okay, I'll step down from my index.html soapbox for a second. You absolutely can, and probably, eventually will, make .HTML files with different names. You will always do it side by side with an index.html file. Continuing the website diary example above, let's see how that might work.
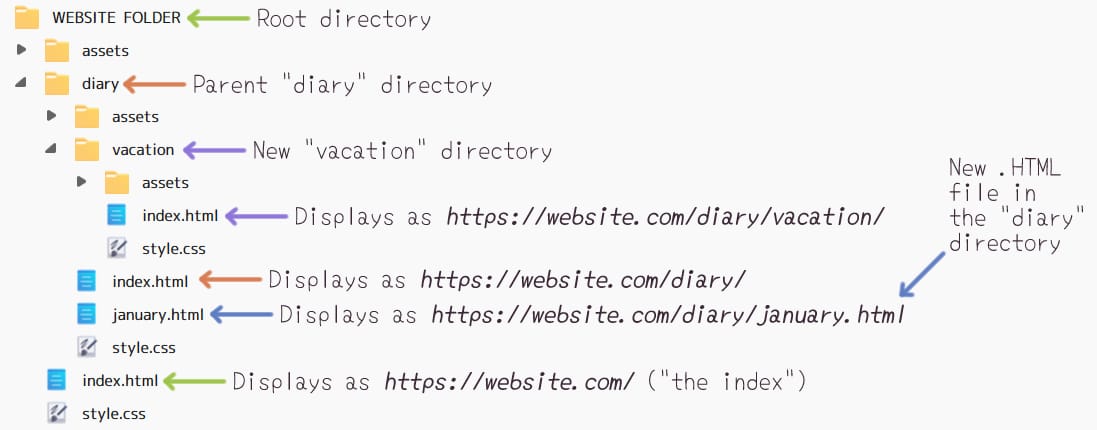
We've added two new things here: january.html beside the diary index, and a new directory called "vacation" with its own index. That january.html file will appear online as https://website.com/diary/january.html. Your webhost may or may not automatically remove the file extension. It most likely will not add the trailing slash we're all used to.
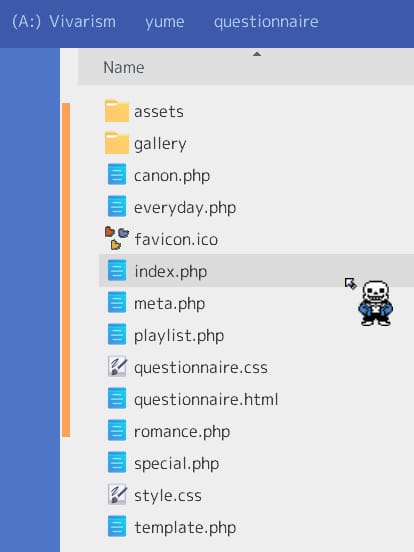
Why do this instead of making a brand new "january" folder? Well, in my practice, diary/january.html and diary/index.html would share the same styling, the same function, and the same assets. Maybe january.html is just an archive of older entries that used to be on the original diary page. For a live example, my Husbando Questionnaire has all of its files in the same directory because, aside from the written content, each page is identical to the other.
Meanwhile "vacation" gets a whole new directory because, in my imagination, it looks and functions differently to the main diary. Maybe it's primarily a photo gallery. Maybe it's decorated with motifs from the place you visited. Maybe you want the URL to appear as https://website.com/diary/vacation/ because you really like that trailing slash.
At the end of the day, it's your website. You can put things wherever you want!
Use Relative File Paths
One of very few things I got right on 5AMBF was my use of local, relative paths rather than absolute ones. Now, what's a path? You use them every time you source an image or create a hyperlink. Here are some examples.
Images

Let's say I want to add this cute Flonnetorials banner to the page. That means I've got to write into my HTML, <img src="whatever whatever">, right? The "whatever whatever" part is what we're dealing with today.
A lot of beginners use absolute paths: direct links to the location of their image on the Internet. When you're working with services like Carrd, Tumblr, or Strawpage, that's what you have to do. You upload your images to Catbox or whatever and copy the links. But guess what— when you have your own website, you can host your own images! And you can link to them in a much faster, more efficient way using relative paths.
Let's see how it might look:
| Image Pathing | |
|---|---|
| Absolute | <img src="https://vivarism.net/writing/tutorial/assets/flonnetorials.png"> |
| Relative (from the root) |
<img src="/writing/tutorial/assets/flonnetorials.png"> |
| Relative (within the hierarchy) |
<img src="./assets/flonnetorials.png"> |
See how the first two are exactly the same, just with https://vivarism.net/ at the beginning of the absolute version? That section, https://website.com/ is what makes the path absolute. It's telling the computer, "you absolutely must go to that specific webserver!" Without that at the beginning, the computer will, by default, look on the local server instead.
The final relative path, what I call "within the hierarchy," shaves off even more of the beginning of the code. Why? Well, because the location I'm pointing at is very close to the page we're on right now. That dot-hack at the front (./) means "stay in the current folder." In this case, I'm looking for /assets/flonnetorials.png right where I am, in the tutorial folder.
All three lines of code above will produce the same output. However, a relative path will always be much shorter, much prettier, and most definitely the best practice when pointing at locations on your own server. As you are making your website, strive to ALWAYS use relative paths for images in your HTML and CSS files. (More about that in my hotlinking diatribe.)
Hyperlinks
But what about hyperlinks? In this case, there are good reasons to use both kinds of paths. First, let's just see what they look like. Imagine I want to send you to my Explore page, specifically the Web Design section.
There are a few different ways to write it:
| Hyperlink Pathing | |
|---|---|
| Absolute | <a href="https://vivarism.net/explore/resource/#design"> |
| Relative (from the root) |
<a href="/explore/resource/#design"> |
| Relative (within the hierarchy) |
<a href="../../explore/resource/#design"> |
In this case, the absolute path is certainly viable... for everyone else on the Internet. If YOU were the one linking to my Explore page, that is the ONLY thing you could write! Remember, https://website.com/ is what makes the path absolute. It's telling the computer, "you absolutely must go to that specific webserver!" Without that at the beginning, the computer will, by default, look for the location on your server.
Because this is my server, meaning I am directing people around my own website, I can and should use relative paths instead. Did you notice how the length of the paths, either "from the root" or "within the hierarchy," have swapped lengths compared to the last example? That's because, in relation to this tutorial page, the explore directory is pretty far away.
Navigating the Hierarchy
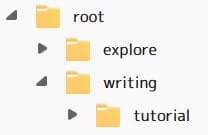
There are two ways to arrive at my destinatin. First, I can navigate through the hierarchy using dot-dot-hack (../) to go up and out of the folder I'm in. In this case, I need to use two ../../ to leave the tutorial folder, then the writing folder, and arrive at my root (i.e. first/topmost) directory. From there we can go into explore and beyond.
But why bother with that when I could just jump straight to the root with a single hack (/)? I will always choose the shortest path because I like things simple and clean! However... when working with offline files, "jumping to the root" may not work, depending on where you placed your website folder. I always keep my stuff in its own partition to facilitate my root jumping, lol. But it should always work on the live, https:// version!
See this simple and helpful article for more information on how to use relative and absolute paths. Definitely check it out if my stuff about navigating through the folder hierarchy confused you.
In Summary:
When you are linking to someone else's website, always use absolute paths that start with https://.
When you are linking to files on your own website, always use relative paths.
Compress Your Images
For the love of God, please, if you take nothing else away from this article... COMPRESS YOUR IMAGES! When all you want to do is immerse yourself in someone's handcrafted Internet aesthetic, doesn't it jostle you out of ~the zone~ if the page loads too slow? Many different factors contribute to load times, but the simplest one to solve is oversized images. Trust me, "anime_girl.png" does not need to be 3.44MB.
You don't even have to make your images physically smaller— as in resizing the height and width. We live in an age where you can still have a giant, highres image with an appreciably smaller file size. It's all thanks to the magic of image optimisation! That said, I do advocate for making images only as big as they need to be. If your anime girl only occupies about 300sqpx (square pixels), her original image does not need to be three thousand sqpx.
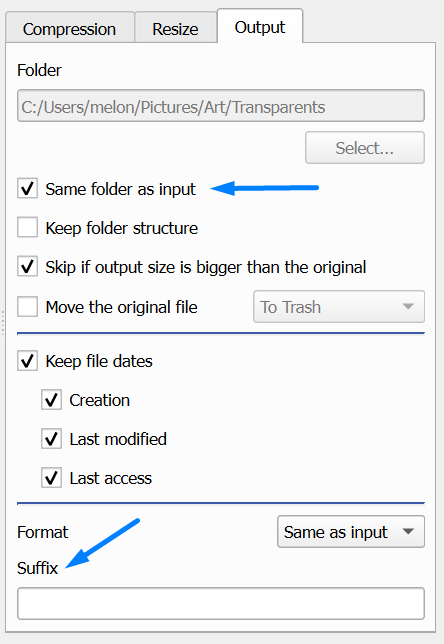
I use a free software called Caesium Image Compressor. It's so simple, it requires no elaboration. It's fast, robust, and can do things in bulk. I personally have it set up to automatically replace the original image, just for ease of use. If you want to have an uncompressed backup, make sure your settings DO NOT look like mine. Either designate a folder just for the compressed versions, or have it add a suffix like "_xs".
To compress .gifs, I use EZGif. TBH, I use EZGif for all my .gif related activities. It's such a stand up little site, I've never felt pressured to find an offline alternative.
When To Leave Images Un-Compressed
Image optimisation works by reducing the overall number of colours in the picture. Very small images, like anything under 200sqpx (i.e. 100x100), or images with very few colours or faint variations between colours, should be left as they originally are. Here, let's use a random background image and some of my art as an example:
| Original | Compressed |
|---|---|

|

|

|

|
As you can see, in some cases, compressing the image strips it of all detail. Compressing my pixel art, especially when animated, creates odd artefacts and flashes. The smaller file size isn't worth it! In any case, images like these usually don't take up much space to begin with, so there's no harm in leaving them at their original size.
Create Interactive Designs
The best thing about a website is that you can point and click on it. Seriously! Take hyperlinks for example, the quintessential interactive feature of every page online.
This is a boring link.
Nothing happens when you put your cursor on it.
Now, this link... this link changes colours!!!
Cool, right?!
And guess what... SLIDING is allowed, too!
For fully fleshed out examples, witness unbridled creativity at:
My stuff is nowhere near as cool as theirs, but for years I've been obsessed with making chunky rainbow buttons that slide around, as seen on my homepage. It's so satisfying to me, I will spend a long time just running my cursor up and down my navigation sidebar, hahaha. For a few more understated, but still extremely epic and cooler than me(!), examples of interactive designs, check out:
And it's not very hurrdurr indie web of me but, genuinely, one of my favourite instances of interactive design is Apple's webpage for 3rd generation Airpods. (Note: it works on desktop but is definitely more stylish and fluid on mobile.)
Years ago, I was just trying to replace my stupid, worthless, wireless earbuds that I both loved and hated. All my frustration evaporated when I saw so much care put into the page design. It just absolutely wowed me— I had to get on my computer and check the source code to see how it worked. Turns out it's a canvas graphic that updates its styling according to your scroll position. How novel!
I mean, just compare it to the 2nd generation Airpods page. It's a totally different experience, right? That's the power of interactivity!!! Obviously I don't expect a beginner to create anything this advanced; I just want to open your mind to the endless possibilities of web design. When it comes to creating cool things, the only limit is your current skill level. So start making your personal website ASAP!!!!
Troubleshooting Tips
... did you stop to go write some CSS? Great! Uh... did it do exactly what you wanted it to do? On the very first try?? Not likely. But that's normal and okay! No matter how good you get at making websites, you will always get confused, make simple mistakes, and encounter problems you can't immediately solve. Just accept it as a normal part of webmastery. Keep calm and don't beat yourself up!
Here are a couple resources for debugging your work:
As always, you can also search "css" when looking for more specific help. If you are using someone else's template, widget, or code snippet, you can ask them directly, too! Unless they've explicitly told you, "you're on your own," then I'm sure they'd be happy to help. When it comes to my own strategies, I do things like...
- Add
outline: 2px solid red;to "block" elements.Just to see where they are and if my CSS is working! I use different coloured outlines to differentiate between elements as I'm laying out new pages.
- Add
color: red;to textual elements.Once again, just to see where they are and if my CSS is working. If the text doesn't change colour, I know I'm doing something wrong.
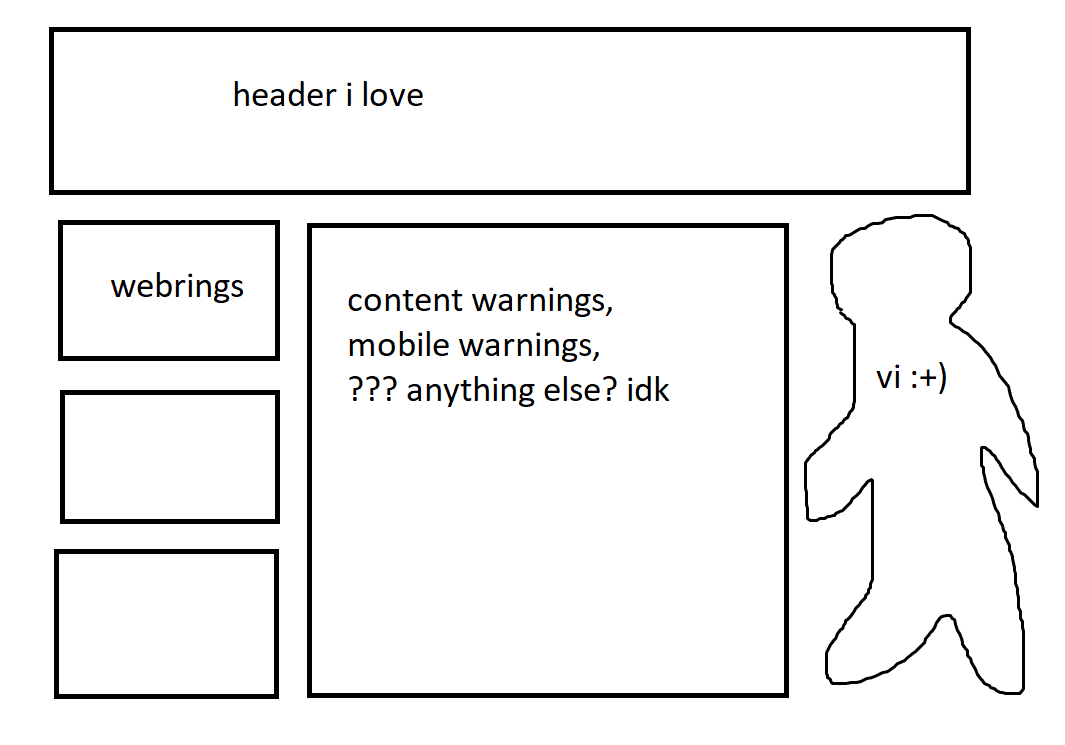
- Draw layouts in MSPaint.
I know some talented artists who create elaborate mockups of their designs in advance, incorporating the actual colour palettes and assets they intend to use. Mine just look like this.
![]()
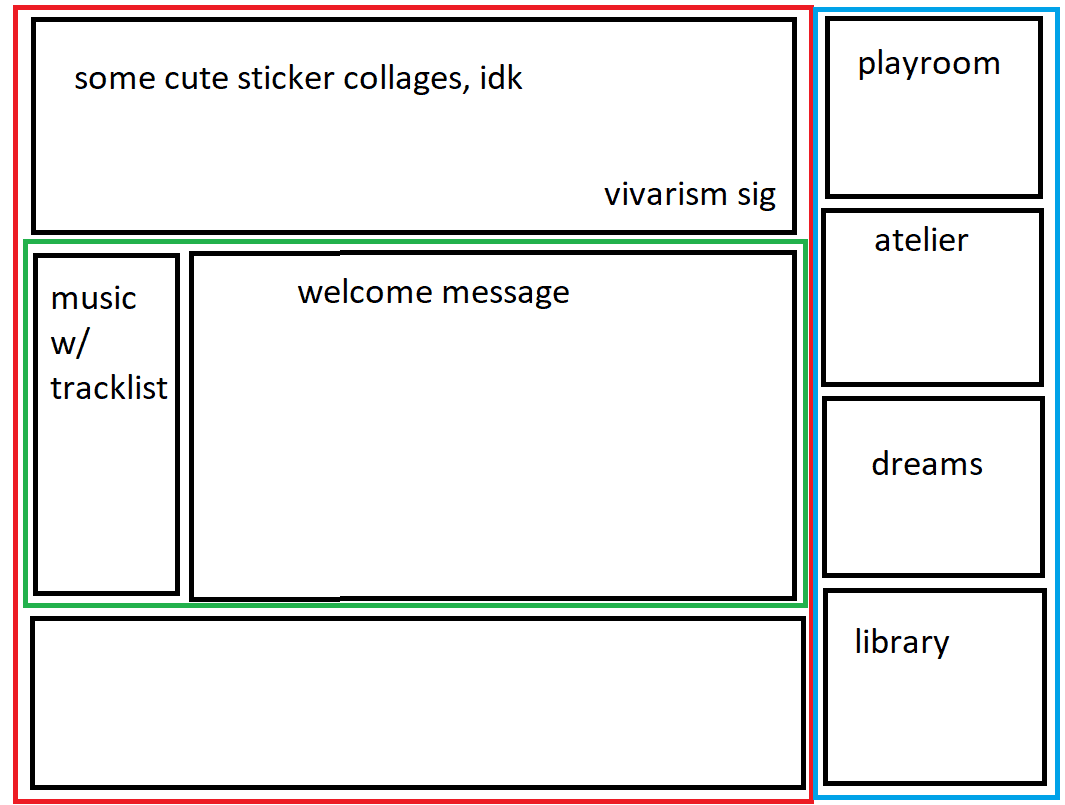
- Break things down into boxes.
No matter how your design looks on the outside, on the inside websites are just boxes arranged in various ways. Drawing sections around my MSPaint plans helps me understand exactly how things should be laid out.
![]()
- Take a break.
I have solved some of my biggest CSS puzzles in the shower. When in doubt, walk away and come back refreshed!
Protect Your Privacy
The whole point of a website is that it's on the web. It's online for strangers to see*. With everything you put online, keep in mind that you do not know who views it, nor can you control how they respond to it. If you wouldn't say in a real-life public place what you said on your website, either don't say it or make sure nobody ever finds out who you are.
*If you don't want anyone at all to see your site, simply work with offline files and never upload them anywhere. I have done that myself from time to time— it's still fun! You can also make password protected websites just for close friends to see. Again, super duper fun. I may make a tutorial on that later.
Anonymise Yourself
How many people know your first name, date of birth, and the state or province you live in? Well, that's the number of people who can find you with a single Goo*le search. It's up to you how fast and loose you play with you real identity, but I advise everyone to reserve 3D dealings for friends you genuinely trust. And just because someone else tells you a lot of their personal details does NOT mean you owe them the same information in return.
I also suggest removing your data from people search websites. Always be cautious with what you disclose and to whom. For years I've been butting up against stories I want to tell or pictures I want to post on here, but Godly intuition curls in my gut and reminds me, "Flonne, anybody with a personality disorder could use this to find out what high school you went to." And then I don't post it!
Remove EXIF Data from Photos
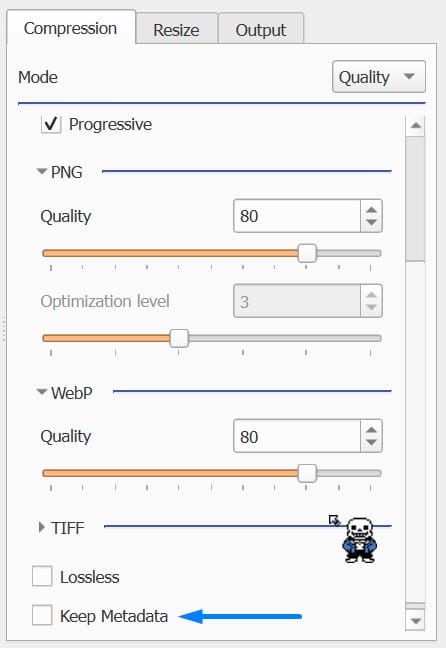
EXIF data is some fancy code that tells you when and where a photo was taken, what kind of camera was used, and more. If you don't want Internet people knowing where you live, then while you're compressing your pics, you should wipe the EXIF, too. At the bottom of Caesium's "compression" tab, there's a checkbox that says "keep metadata." Leave that unchecked.
Many social media websites— and I think Neocities, too— automatically remove the EXIF for you. But if you're hosting on your own, or otherwise unsure what privacy protections the platform offers, better safe than sorry. Plus, you are compressing your pictures anyway, aren't you?! It's easy!
Be A Good Netizen
Your experience on the independent web is what YOU make of it. If you set out to learn new things, express yourself creatively, and connect with like-minded individuals, that is what you'll do! Everyone makes mistakes, and every mistake listed here can be forgiven, so it's understandable if you mess up sometimes. Just do your best to respect yourself and others, and everything will work out.
Hotlinking

Hotlinking a file, usually an image, means you are sourcing it from someone else's website. You did not upload the file to your own server or even a free filehost. You just see their stuff and you like it, right? So you right click, copy image address, and paste! Don't do this.
Every time someone visits your site full of hotlinked files, the person you stole from pays for it. The data required to deliver that file to your visitor comes out of their hosting costs. You are literally stealing their money.
Best practice: download the file you like, upload it to your own website, and use a local path. Alternatively, upload it to a free filehost (like File Garden) and link it that way. Basically, you need to have your own copy of this file.
Never, ever, EVER hotlink without explicit permission— and you sometimes will receive explicit permission! The Electronic Frontier Foundation's Online Free Speech Campaign encourages hotlinking their Blue Ribbon Banner for websites with less than 30k hits per day. On the indie web, some websites (like Unicode Angel) prefer it when people hotlink their 88x31 buttons and such, so that everyone will have the most up-to-date version.
I'll write more about hotlinking sometime soon, primarily how to prevent people from doing it to you LOL. In the meantime, try to hotlink this image from me. See what happens.
Copying or "code stealing"
Do not copy someone's entire website, change some of the text, and publish it as if it was your own. Of course, you can view the source code and download any page you like, but be sure do it PRIVATELY. If you're already working offline, this shouldn't be a problem.
I think taking code snippets is fine— oftentimes in CSS there is only one way to do something, after all. Just don't take too much. When in doubt, ask permission and give credit.
Cloverbell, whose gorgeous website often falls victim to this practice, put it beautifully:
Please be respectful. My website is not a template.
A personal website is an extension of you, so I'd like to encourage you to make something that is truly your own. Don't deny yourself the rewarding experience of making a unique website that is true to you.
It's totally okay to copy my code or learn from it to improve your own code, I'd just rather people not make reskins of my website. Thank you!
Indefinite Website Closure
Have you ever wanted to visit your favourite website again, only to find yourself locked out at the very first page? The owner has replaced the entire thing with a short message saying their site is "under construction!" They urge you to check back "later." When exactly that is, they make no indication. Often, "later" never arrives and the website you loved is lost to the void. If only they hadn't put up that stupid "construction" message, you'd still be able to enjoy what was there before.
This one is much less a hard/fast rule and moreso my personal pet peeve. Ultimately, your site is yours to do with as you please. I'm not here to make assumptions about or cast judgement upon anyone's reasons for temporarily or permanently taking their work offline.
All I ask is your serious consideration in keeping your site available. Even if your work no longer meets your standards, it was just fine by us visitors. In my many happy, successful years on the indie web, I have never taken my stuff down, not even the stuff that no longer represents me. Here's what I do and suggest you do, too:
- When making a new version of your site, leave the original right where it is.
- By now you should be working with offline files, right? Just upload all the new stuff when you're done.
- Resist the temptation to delete your old work. Please keep an archive on your own computer, at least. You'll thank me later.
Harassment
Do not go where you are not wanted. If someone's site said, "Sans Undertale fans, KEEP OUT!!!" then I'd stay away, not try to convince them that Sans is the best character ever (even though he is). In the same vein, when annoying people barge into my space, I either let my friends and fans clown on them or I straight up delete the comments.
While I believe we should all stand up for ourselves on our own turf, responses of any kind (no matter how witty) encourage the harasser to continue, either with you or their next target. To those especially sensitive to mean words: do not reply. EVER. Just delete it, forget about it, and go have fun online or off-. With a moderated guestbook, hateful words rarely make it through the automatic censors and only get published with your permission.
Basically, don't like? Don't read. Close the tab and curate your own experience online. If you want to be left alone to do your own thing, always give others the same grace.
Offer content warnings
If your page is pornographic, it is your duty to let everyone know it is an adults-only, "not safe for work" (NSFW)* space before displaying such content. Have viewers confirm their age as 18 or older in order to proceed.
*Initially, NSFW was an adjective referring to basically anything you wouldn't want your boss to catch you looking at on the office computer. Lately, people use it as a noun synonymous with explicit sexual content (e.g. "Gross! He posted NSFW!").
Your website is probably not pornographic, but it still might feature mature, controversial, or otherwise startling subjects. In that case, consider giving your visitors advanced notice. Something as simple as, "this site is owned by an adult and intended for adult audiences. No specific warnings past this point," can be helpful.

Many years ago, Madlabs created these Censorship Panda adoptables to give websites age ratings, ranging from "WEB-G" to "WEB-NC-17." Some webrings and weblistings require members to rate their websites to join. Artists Online, for example, uses the ESRB system.
Vivarism is rated according to Madlabs' scale as well as the Eirin system. I placed both labels at the top of my homepage. Explanations of the ratings appear on hover for desktop viewers and as Javascript alerts for people on mobile. Maybe you can do something similar!
Give credit where it's due
If you use someone's template, tutorial, art, or assets, you must link back to the source! Imagine you created something like that— wouldn't you want to get the recognition you deserve? Just use common sense and kindness here. Sometimes people will say "no credit required," but I suggest linking to them regardless.
My policy is that if you found something useful online, you should share it. It helps your visitors learn new things and find more resources. Like that, we can all have a better Internet.
Connect with other webmasters
Not just to give credit, but person-to-person. Link to websites you like without expecting a link back. Leave compliments in their guestbooks or even send an e-mail, knowing you might not get a reply. Join and create webrings, listings, and cliques. Ask to affiliate. Spread kindness and gratitude wherever you go. Create the kind of community you want to belong in!
Most Importantly...
☆ Have fun!!! ☆
I'm being so for real right now. What's the most fun and interesting thing about making or maintaining a website? What motivated you to start? What keeps you coming back? Whatever your answer is, focus on that. That's what turns problems into puzzles.
I make websites because I adore CSS. I'm not so good at drawing or drag-n-drop type graphic design. Being so easy to write and reproduce, CSS lets me create adorable, interactive visuals that would otherwise stay trapped behind a skill barrier. For me, the entire process— the flash of inspiration, laying everything out in HTML/PHP/CSS, finally populating the page with all my illustrious words... Ahh, it's just so satisfying!
I love the culture on the indie web, too. Here, we expect slow-paced, long-form content, and the connections I've made through Vivarism outpace my long-forgotten social media mutuals by miles. This is the only online space I want to exist in. Cultivating a cute little corner of the web, just for me, my friends, and whoever else might stop by... This is my greatest joy.
What About You?
Yeah, YOU! Why do you make websites, or want to start making one? Tell me everything— get your inspiration flowing!